A Mail Merge can be performed by opening Word and going to the MAILINGS tab on the ribbon. To complete a successful merge, there are 5 basic steps. Lets run through them before you put them into practice in the assignments.
Step 1 – Setup the Basic Main Document
All mail merges require 2 files – a main document and a data source. The main document contains the text that is the same in all the merged documents.
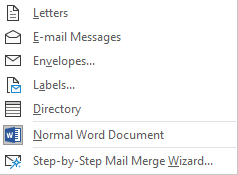 By clicking on the Start Mail Merge button on the Mailings tab, you will see the list of different main documents you can choose from.
Select the main document you wish to use.
If it is a letter, you can open an existing document or you can create a new document, ensuring all the text is thoroughly proof read.
Ensure the document is saved before moving onto the next step.
Step 2 – Select or Create a Data Source
The data source provides the information that is unique in each individual document e.g. name and address.
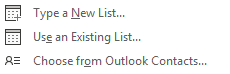 On the Mailings tab click on the Select Recipients button.
If you do not have the data source set up, you will need to create this document as well. In which case select the option to Type a New List.
If you do have a data source document setup, select Use an Existing List and navigate to the data source file in the File Explorer window that appears.
The third and final option is to use contacts direct from Outlook by selecting Choose from Outlook Contacts.
Further instructions for each of these options, as well as editing your data course, will be covered in more detail in the next lesson.
Step 3 – Insert the Data Source Fields
After the main document is set and the recipient list is connected and edited, including matching only certain records, you are ready to insert the merge fields in the main document.
These are placeholders in the main document for the unique information from the recipients list data source. Therefore, when you put a merge field in the main document, information from that field will appear in the document that is unique to that recipient.
With the main document open, place the cursor where you wish to insert the first merge field.
There are 3 buttons you can use to insert merge fields, Address Block, Greeting Line and Insert Merge Fields. They are all self-explanatory but worth noting that the Insert Merge Fields option is a drop-down menu where you can choose from the range of merge fields to insert, so will probably be your first port of call in most instances.
When you insert a merge field into the main document, you will see chevrons appear either side of the field name e.g. <First Name> which helps you to distinguish between ordinary text and fields.
Continue to add the different merge fields to your main document until you have all the fields in the right places. Make sure there is a space after the field name where necessary so the text is inserted correctly.
If using the Address Block feature, you may need to help Word by matching fields with your data list. For example, your data list may have a column titled Office Address, and Word may not pick up that this is the same as Address 1 which it refers to. In which case, you can simply use the Match Fields button to tell Word how you want your data to be linked. The same applied for the Greeting Line feature, although is of course less-likely to run into such problems.
Step 4- Previewing the Mail Merge
It is helpful to see what the data will look like once it has been inserted into a document. You can use the preview option to check that all is well before you finish the merge.
Use the Preview Results button on the Mailings tab – and you will see the data from the first record is merged into the document.
You can browse through the different records to see how several merged documents will appear.
You can also simulate the mail merge process to make sure it will run smoothly before performing the final merge.
If you click on the Auto Check for Errors button and then the Simulate the merge and report errors in a new document button.
Step 5 – Completing the Mail Merge
 Once you have previewed how the main document and data source merge and everything looks fine, you are ready to complete the mail merge.
Click on the Finish & Merge button and then choose from one of the three options;
- Edit Individual Documents
- Print Documents
- Send Email Documents
You will have the option to select which records you wish to merge before the merge is carried out.
Let’s have a look at a basic mail merge in action. The video below shows how to use Mail Merge to add addresses and names to a letter using a data source that has already been created in Excel.
As mentioned, you will get a chance to run through this procedure on the assignments in this unit. Move on to Lesson 2 – Creating & Editing Data Sources when ready.